Wax Modeling
All of my fantasy jewelry creations start with concept, design followed by sculpting (modeling) in wax: faerie, mermaid, dragon, unicorn, maiden or any other type of flora, fauna or other mystical being all start the same way. This also holds true for the different items of fantasy jewelry I may be creating: necklace, pendant, ring, bracelet, belt buckle, earring or ear cuff. The following steps show the wax modeling process for the
dragon trio neck wire.

Wax Modeling Techniques
This is the design for my dragon trio necklace. I find that the more I sketch and formulate the layout and proportion in the beginning, the more able I am to see what I will need to do (and any problems that may arise) as I transform the drawing from two dimensions to a three dimensional sculpture.

Basic Form
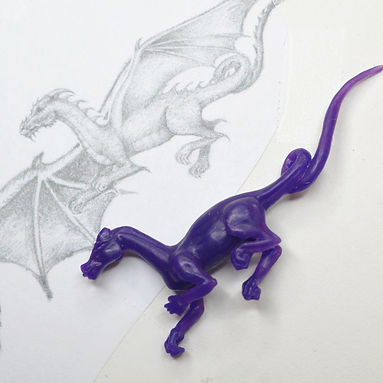
I started sculpting on the dragon on the right first. If I have a design that has a background I usually start from the back and work forward with each layer gaining detail. In this case all 3 dragons are basically on the same level so I could have started with any one of them. I guess I picked her because I felt the most confident of how I wanted to proceed with the wax sculpture.
I start by actually tracing over my design and cutting out the shape in pink sheet wax then dripping "Perfect Purple" wax on top of the pink shaping the basic form of the dragon's body, head and tail. This way I know I have a strong foundation in proportion and scale to build the rest of my work on my dragon trio necklace. I find that the more I sketch and formulate the layout and proportion in the beginning, the more able I am to see what I will need to do (and any problems that may arise) as I transform the drawing from two dimensions to a three dimensional sculpture.

Addition of Legs and Musculature
I refer frequently to my drawing, especially in the beginning stages of wax modeling. The drawing is an important aid to make sure that the scale and proportion are what they need to be. When working in such a small size being off a fraction of an inch can make an enormous difference on how the piece will look.
At this stage I have cut the legs out of the pink wax, attaching them to the body and once again, adding purple over top to add dimension and form muscles. In the creation of fantasy creations musculature is as important as in any realistic figure. Once I started to understand the musculature of a horse, dog, cat or other animal I could start to apply the structure of those animals to fantasy creatures.
Refine Musculature and Start Detailing
At this point I start to refer to my drawing less frequently and let the wax take me where it will. I know the basic pose, scale and proportion will be correct so am free to make changes as needed. Sometimes I may find when I am going from a two dimensional drawing to a three dimensional sculpture some things need to change along the way to make it work properly; change the position of a leg, turn of the head, twist of the body, etc. In this case the dragon is very close to the original layout, but even subtle changes, like lowering one of the front legs so they aren't on such an even plane can make a big difference in the overall feel of the finished piece.
I refer frequently to my drawing, especially in the beginning stages of wax modeling. The drawing is an important aid to make sure that the scale and proportion are what they need to be. When working in such a small size being off a fraction of an inch can make an enormous difference on how the piece will look.

Detailing - Applying Scales
Detailing, for me it can be the most tedious, time consuming yet satisfying part of the sculpting process. Like an author unfolding a story, it's the details and subtleties that make fantasy jewelry come alive. Often they exist of things that the viewer may not notice at first, if ever, but combined make a huge difference in the overall feel of the finished piece.
In this instance it's adding row upon row of scales to the dragon. I do this by dripping tiny dots of wax in a row across the surface. I then scrape across the surface of the dots flattening them at an angle. I use pink wax for this since it is softer and flattens easily. I continue the process adding each row slightly overlapping the previous one and off setting the placement of the scale, like bricks in a building.

The Start of Dragon Number Two
On to dragon number two, on the left. As I work on a piece of fantasy jewelry I tend to gain confidence and direction as I go, so even though the central dragon is actually behind the two on the sides, the middle dragon is the focal point of the neck piece so I decided to sculpt him last.

At this point I've defined the basic shape, added legs and most of the musculature. This is one of those cases where my design had the dragon looking toward the viewer, but soon after I started sculpting realized that I wanted his head turned toward the side.


Protecting Areas That Are Complete
OK, so this looks more than a little odd, but it is one of the great tricks that I've found while sculpting wax. Wax is sticky. As I form and shape the dragon sculpture little bits of wax stick to my tool, my work surface, my fingers and most importantly, to other areas of the dragon where my attention isn't focused. I can have an area totally smooth and just the way I like it, only to look at it a short time later and have it embedded with little bits of wax and fuzz. Where all the fuzz comes from I have no idea. Yes, I have a dog and two cats, but this isn't usually fur (OK a little fur) but just excess crud on the surface of my wax . . . not at all attractive. So as I sculpt I wrap a completed portion in plastic wrap, (Glad Press 'n Seal works the best) to protect it from all the tiny debris that wants to stick to the wax. It looks odd and certainly doesn't make for a pretty photo, but it works great. Sometimes I even cut a tiny piece of index card to add support to the wax before I wrap it. This helps to keep the wax from breaking as I handle it; even so, I think I broke each of the dragons tails at least once, but that's better than 5, 6 or even more times. And if it does break it contains the broken piece so I'm not spending an extended time on my hands and knees hunting for that missing tail tip or having to totally re-sculpt it
design had the dragon looking toward the viewer, but soon after I started sculpting realized that I wanted his head turned toward the side.
Completion of Dragon Number Two
The scales, spikes, wings and all the rest of the detailing were done on this dragon as for the first one. Of course pose and shape are a little different so I adjust accordingly as I sculpt.
I really love the attitude of this guy. The first dragon in the necklace seemed to have a female nature, very intelligent, precise, yet brave. This dragon seems to be more of a class clown, a bit of a trouble maker, yet surprisingly insightful and ferocious when everyone else falls short.

Dragon Number Three
I've skipped ahead to the completed sculpture of the central dragon of the neck piece. He was created by using the same steps as the other two; pink sheet wax as the foundation, then adding purple to give form, dimension and musculature. Detailing is layered over top of all.
This dragon is the leader of the trio, he has knight like qualities. He fights for honor, is the strongest and bravest of them all, but on occasion lets arrogance and his focus on the goal at hand cloud his judgement.

Dragon Trio Necklace in Wax
So now to get these three independent dragons to work together in one neck piece, it seemed like a rather simple plan, but they had other ideas. The finished piece will be a neck wire. On each of the outside dragons a 10 gauge wire will be inserted and soldered between the wings, with the tail looping around the wire. A solid piece of wire will go around the back of the neck with clasp being in the front. The hole in the central dragons wing acts as the catch, while a hook is attached to the wing of the dragon on the left. Originally I had hoped to totally hide the hook behind the wing of the dragon, but I couldn't do this and still make it function properly. It would be so much easier to just sculpt without concerning myself about how the finished piece is actually going to function as wearable fantasy jewelry. It would be so much fun if those dragons could just hover around a persons neck where I wanted them, maybe even with a flap of their wings and a puff of smoke now and then. Awe, in a truly magical world they would do just that, of course you might also have to worry about the occasional bite or jet of flame so maybe it's good that they aren't too real.
So that's it, a wax sculpture from start to finish to make this fantasy jewelry dragon necklace. To see the casting and finishing process go to my Lost Wax Casting Process Page.